DIVIS TIP OF THE MONTH
Export of video sequences in CargoVIS & ParcelVIS
Part 2: The detail view
Bordesholm, June 28, 2019
In the last tip of the month, we have explained how to export search results in our video management software. Today we deepen the topic and show you how to edit individual video sequences in the detail view.
Use the tab "Export review" in the workspace register to access the search result.

Screenshot: In CargoVIS hit the diskette symbol (left), in ParcelVIS the hard disk icon (right) to access the search result.
In the export tab the individual sequences of your search are displayed by thumbnails. Using the thumbnails, you can now open the detail view of a desired sequence.
How to open the detail view
Variant 1: Double-click on the preview image
A double-click with the left mouse button on the video sequence to be edited opens the detail view. You can also leave the detail view the same way (double-click with the left mouse button on the video image).
Variant 2: Context menu
Hold the mouse pointer over the preview image of the desired sequence and open the context menu with the right mouse button. Via the menu item "Change time window" you get to the detail view.
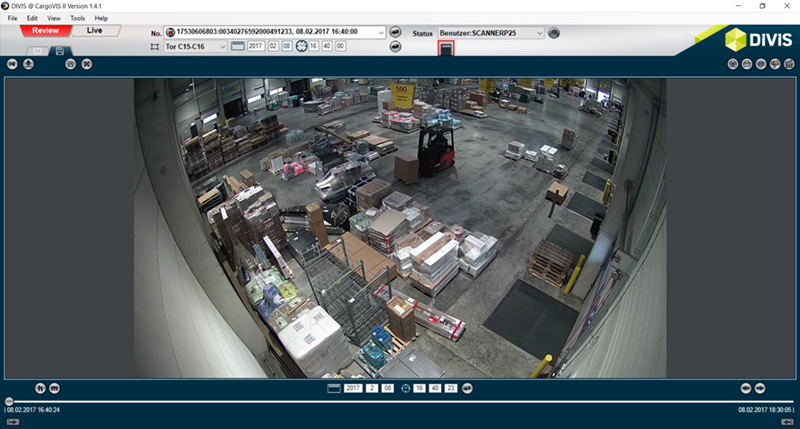
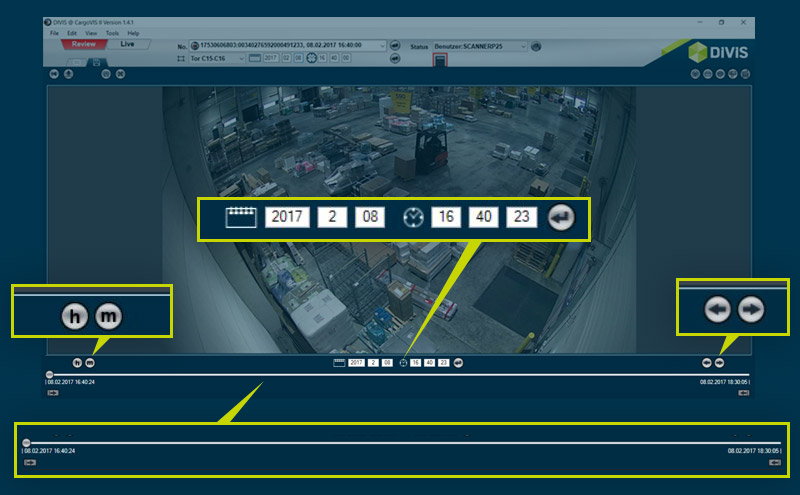
Screenshot: Detail view with controls for editing and operating the sequence
In the detail view you can navigate through the sequence and adjust it if necessary.
For quick navigation, hold the mouse pointer over the camera image and use the mouse wheel to jump to the next or previous camera image as done in the search.
There are also other helpful controls available for navigation.
Controls (Buttons) in the workspace
1. Bottom controls
1.1. Left
Hour steps
Minute steps
In addition to the above-mentioned frame-by-frame (picture-by-picture) navigation via the mouse wheel over the camera image, the two controls "h" (per hour) and "m" (per minute) offer two further options for navigating through the sequence in hour or minute steps. To do it, do not hold the mouse pointer over the camera image, but over the respective button – "h" or "m" - and scroll back and forth using the mouse wheel.
Navigate in increments of seconds or minutes with "locked" buttons
Each of the two buttons ("h" and "m") can be locked (activated) in the active status by double-clicking. An activated button is displayed in a bright green. If a button is locked, then the mouse pointer can be held either over the relevant button or alternatively also over the camera image in order to navigate backwards and forwards through the sequence by mouse wheel in minute or hour increments. By clicking again on the button or another button, the locking of these elements can be canceled.
1.2. Center
Date and time

Screenshot: Date and time in the search sequence
The date and time fields the time of the currently displayed image is displayed. Here you can select any point in time. To do this, either hold the mouse pointer over the respective field and set the desired value with the mouse wheel or enter your values manually directly into the fields. Then click on the
confirmation button to enter the selected time.
Each time the displayed image is adjusted, the time of the new image is entered in the date and time fields, previous adjustments are discarded.
1.3. Right
View previous image [backward playback]
View next image [Forward Play]
These two buttons can be locked via double-click and then turn green. When locked, the current view is automatically played forwards or backwards, depending on the selected button. By clicking again on the button or another button, the playback can be stopped. Alternatively, you can move backwards or forwards in the sequence, frame by frame, by clicking on the arrows.
1.4. Over full image width
Timeline
The timeline shows the period of time for the current sequence as seen in the search. You can quickly jump to any point in the timeline using the slider. At the bottom left and right under the timeline, the current start and end of the timeline are displayed.
The two buttons below the start and end times of the timeline can be used to extend or trim the current timeline.

Screenshot: Timeline with buttons for moving the start and end time of the sequence
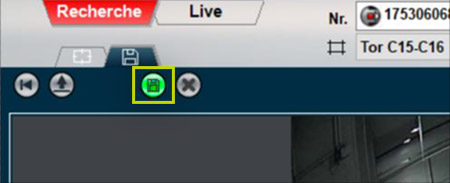
Important note: All adjustments must be saved again before leaving the displayed part of the export. If there are unconfirmed changes, the button to save changes is green (top left).
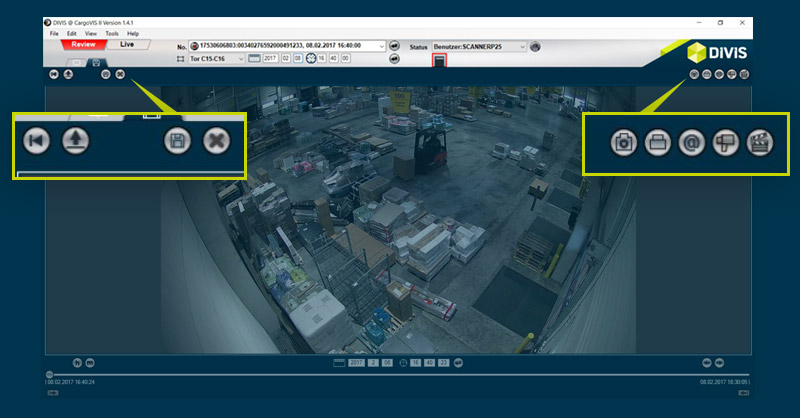
2. Upper controls
2.1. Left
Edit previous or next video sequence
Using these controls you can easily navigate back and forth through the different sequences of your search without having to leave the detail view mode.
Arrows left: Previous sequence, Arrows right: Next sequence
Back to overview
With one click you get back to the overview with the thumbnails
(or as already mentioned by double-clicking with the left mouse button on the video image).
Save changes
If you have made changes in one or more detail views, save them via the button with diskette symbol (if changes were made, the button lights up in green, indicating that you need to save).
Button lights up green = Changes exist, the button must be clicked to save the changes.
Discard changes
All changes made can be undone with one click.
At the bottom left of the workspace is another set of controls for navigating through your video footage:
2.2. Right
Save frame
The currently displayed picture is saved as a single image (JPEG file).
Print single image
The currently displayed image can be printed out.
Send single image by e-mail
The currently displayed image can be sent by e-mail.
Export this object
The video sequence opened in the detail view can be exported as a PTD or PTD2 file.
Save this object as AVI
The selected sequence is exported in AVI format.
Export video sequences in CargoVIS & ParcelVIS Part 1: Evaluate and export search results

Find palletized shipments quickly with CargoVIS
With our video management software for cargo handling, CargoVIS, we offer you a comprehensive and easy-to-use system solution for the image-controlled investigation and tracking of palletized goods.

ParcelVIS for CEP providers and HUBs
Save time and money and let ParcelVIS work effectively for you with image-based consignment investigation in the transshipment warehouse: Entering the parcel label number is your key to all information on the whereabouts and status of a consignment during all scanned events.

